PART 1 — Sizing
Step 1 — Measure
You’ll need a soft measuring tape or a piece of string and a ruler.
You can use whichever feels easier for you.
Soft Tape
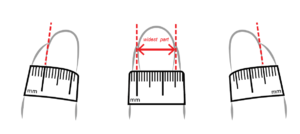
Wrap the tape around the widest part of your nail and write down the width in millimeters.
String Method
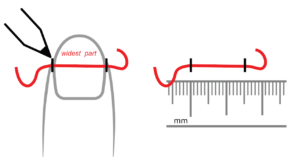
Lay a piece of string across the widest part of your nail.
Mark both edges, then lay it flat and measure the distance between the marks in millimeters. Repeat for each finger.
Step 2 — Match
Match your numbers to the size chart below.
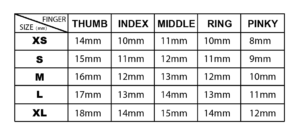
If you’re between sizes, choose the larger one.
You can gently file it down, or warm the nail over a cup of hot water for 10–15 seconds and softly press the sides to adjust the curve.
Ready-to-ship sets follow standard sizing.
For custom sets, simply leave your measurements in description on the product page — I make each nail to your exact dimensions.
PART 2 — Prep
Prep Is Everything
Good prep really makes a difference for long wear.
- Gently push back your cuticles
- Lightly buff your natural nails
- Clean thoroughly with the alcohol wipe and allow to dry
Once your nails are clean, try not to touch the surface — natural oils can make the adhesive less strong.
PART 3 — Apply
Sticky Tabs (1–3 days)
- Choose the tab size that’s closest to your natural nail
- Press firmly to remove any air bubbles
- After removing the film, avoid touching the sticky surface
Apply the nail at a 45° angle, starting near the cuticle and pressing forward slowly. Keep your hands dry for the first 2–3 hours.
If you notice any gaps, you can layer a smaller sticky tab on top of the one already applied to gently improve the fit. If your natural nails curve downward, you can fold an even smaller tab at the tip to softly fill the space, then trim away any excess.
The idea is to try your best to avoid any air bubbles. This helps keep your natural nails healthy and your results looking clean and beautiful. Air bubbles can trap moisture and allow bacteria to grow, and for semi-transparent shade nails, they may also cause uneven coloring that affects the overall look.
Solid Nail Glue Gel (2 weeks+)
You will need a UV light and solid nail glue gel.
- Apply a small bead of gel to your natural nail
- Press the nail on from cuticle to tip to remove air bubbles
- Remove any excess gel from the sides
Cure the edges for 30 seconds, then cure the center for 60 seconds under UV light.
If your set is a darker color or has a complex design, simply double the curing time. A little extra gel is better than air bubbles — you can always clean up the excess. Same idea here to try your best to avoid any air bubbles
PART 4 — Removal
Sticky Tabs
Soak your hands in warm water mixed with oil (cooking oil or body oil) for about 10–15 minutes.
Gently lift the edges with a wooden stick and repeat as needed until the nails release easily. To keep your natural nails healthy and intact, never force them off.
Solid Gel
You will need a remover pen.
Soak your hands in warm water mixed with oil (cooking oil or body oil) for about 10 minutes, gently lift the edges, apply remover into the gap, and repeat until the nail releases easily.
PART 5 — Care & Storage
- Always remove gently — soaking longer is better than forcing
- Roll off remaining glue with a cuticle tool
- For gel residue, lightly file if needed
- Return clean, dry nails to their box for reuse
These nails are made slowly and meant to be worn slowly.
Handle them gently, and they’ll stay with you for a long time.